Welcome to our blog of spooky crafts and macabre decor projects. Halloween is a passion at our house and the two of us have been making our own decorations and costumes for years. Every Halloween we throw a huge party and our goal is always how scary can we make it without breaking the bank. Over time, more and more of our projects have made it into our daily home decor. This blog will show you how we made many of our finished pieces and how we kept up with our budget at the same time. We love feedback and questions so please feel free to contact us.
Showing posts with label paint. Show all posts

Tuesday, October 16, 2012

31 Halloween Projects-2 Snake Wreath

Project 2 of our 31 Halloween Projects is just fixing a project that I did last year but since I started ALMOST from scratch I thought I would still share it.  Last year I made a wreath that was covered in rubber snakes and painted all black.  It ends up looking like a crazy snake nest since it is all one color and the snakes overlap so much.

^ This is the inspiration that I got from Martha Stewart.  She had a really neat idea and I really like that it was matte and subtle.
Last year I found a wreath of branches at Hobby Lobby on sale half price (love a deal) and hot glued rubber snakes all over it and then sprayed it with black multi purpose paint.  It looked great and my mom even asked for one when she saw mine.  I was so excited.

^ This is how my wreath looked this year.  All my snakes fell off!  I fell in love with this shape when I saw it because I thought it looked a little creepier and less store bought.  The extra twigs that were not trimmed off made it look even better.  This looks like a perfect snake den to me, feel free to experiment with different shapes and sizes.  You can also make them in different colors or you can add details to the snakes so they stand out more.

^ You can see all the spaces where the paint is missing because the snakes are gone this year.  I was pretty disappointed that ALL of the snakes fell off before I even used it one season.  This is not from packing or storage, they came off the next day!


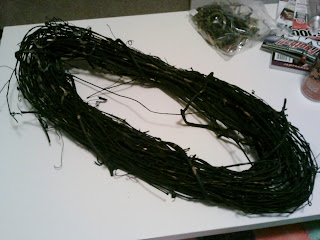
^ I pulled all of the extra hot glue off of the wreath, it came off pretty easily.  I was just left with a black wreath with some weird spots on it.


This is where you would start if you did not have to do any repairs and had a fresh wreath to work with.
I ordered more rubber snakes from OrientalTrading.com and started to glue them back on to the wreath.

Since hot glue was clearly not working I decided to go with a sure fire adhesive, E6000.  I started using this in Art class in high school since it glues almost any surface to any other surface and is strong while it is still easy to work with.
I like to spread the snakes out as I glue so that I get the wreath covered pretty evenly, if you like it more random then do it however looks good to you.


^ Here is a photo of the wreath once all of the snakes were glued on.  The bright colors make it easy to see where I placed the snakes and how they are woven together and through the twigs organically.


^ I wanted to show you my spray painting set up also.  I usually paint my projects at my parents' house since they have the room and we live in an apartment but I was impatient and had a small area to paint this time.  I used a plastic tablecloth folded in half, I taped it to the balcony railing so I would protect that surface and then taped it to the ground so the wind would not move anything.

I sprayed the wreath with satin black paint and covered every inch that I could see.  This was a really quick process since the wreath was already mostly black.  It takes a little longer when you do it the first time because you really have to spray it from every angle.  I did a general coat on the front and then just rotated it around to get all the sides.  Once it was dry I sprayed it from the back and inspected it for any hints of color or unpainted twigs.  (I actually noticed a spot that I missed after it was hung and took it down to do another quick spray.)


Here is the finished wreath.


And here it is hanging on my door.  I really love the way it turned out.

Tell me what you think.  Any suggestions for making a different version?  Anything I can do to explain the process better?  Leave me a comment.

~Liz

Monday, October 8, 2012

31 Halloween Projects-1 Googly Eye Photo Frame

Ok, I am getting ready to get a ton of projects finished up and am really excited to see what you think of them!  I am officially starting off the 31 Halloween Projects posts with number one, a googly eye photo frame.

I, of course, found the initial inspiration on Pinterest.  Here are a couple of photos I have found floating around.
^ This is the one I liked best and is pretty close to what I ended up with.  The original link is here.

^ Here is another one I found.  This looks like it is just a photo that was taken and pinned so I am not sure where it came from.


Below is my version.
 I found a wooden frame and some googly eyes at Michael's. I also had on hand green paint, paintbrushes, multi-purpose glue, ribbon and a cut out.


I started by painting the frame all over on the front and back.  This is a terrible photo of the color by the way; it is a very bright, almost neon, green.


I then opened my bags of googly eyes and started to spread them around on my frame.  I bought several different packages because I wanted different kinds of eyes on my frame so I opened all of the packages and poured them in a large bowl so I could easily pick out the ones I wanted.  I started with the largest eyes I had so that I could space them out the way I wanted.


Optional:  Put the large googly eyes on your face and make creepy faces with your husband.


Keep adding eyes and fill in the spaces as you go.  I tried to vary mine as much as possible so it would be random.


The sizes of eyes you use and the space you have to fill will help determine where to put everything.  Just keep filling it up.


I took some close up photos so you could see all the different eyes I found.  I got a package with lots of different sizes so I had very large (bigger than my eyes) and very very small (the top of a stick pin).  One package had different colored backgrounds, I only really loved the green ones from that package because they matched my background perfectly so I didn't use a lot of them.  Another package had eyelids and eyelashes painted on the front of them.  There was even a package that had different colored irises (the inside of the eye).


This is the jar of what I have leftover, you can see more of the colors that were included that I didn't use.


Keep adding more and start paying attention to the colors as you add them so you don't have too many of the same ones together.


Once it was all finished I was so excited!  I love the way it turned out and a few finishing touches was all it needed.  I touched up any areas that needed more paint and found some ribbon and a Halloween scrapbook punch out that I had.


The ribbon is self adhesive so I just cut it to length and wrapped it around.  I used vellum dots to attach the label so it would stay nicely.  Tip: I made sure to paint the back nicely and wrap the ribbon all the way around the back since mine is on a stand and you will be able to see the back of it.  I bought the frame in the broken/discount section because it didn't have the stand on the back so I bought a cheap plate display stand at the dollar store and used that.

I spent a total of $8 on my frame and I just love it.  You could save money by getting a frame at the dollar store or using one package of eyes instead of the 5 that I bought (I had a TON leftover).  Hanging the frame on the wall or getting one that isn't broken will also save you from the display cost.


Here is the finished product with my fave photo from last year in it.  This is a photo of all the costume contest winners and I just love how goofy they all are.


Leave me comments with your questions.  Is there anything I can do to make the instructions easier or clearer for you?  Let me know.

~Liz

Monday, October 17, 2011

Bloody Longhorn Shirt

In order to be an undead Longhorn fan, we needed the right costumes and part of that was a cool idea we came up with, a bloody longhorn.  If you are unfamiliar, most Texas Longhorn shirts are white with a burnt orange longhorn symbol on the front.  We decided a red, dripping longhorn would be a fun twist.  You can do this with anything really.  You could use a company logo or a well known image to have a little fun.

Here is how we did it.

I bought a blank white t shirt at Target to start with.  Then, I traced a large longhorn from a different t shirt I already had on to a piece of paper. 


I then cut the picture out of the center.
Put a handful of newspaper or cardboard inside the shirt to keep it flat and to be sure the image does not bleed through onto the back of the shirt.  Place the template you just made over the area on the shirt where you want the image and apply the first layer of paint.  A sponge works best but a brush or paper towel would work as well.  Dip the sponge into the paint and then press it onto the plate or paper where you are keeping the paint so it is not overloaded.  I used 2 different colors for this project, Hot Rod Red from Plaid Paints that is indoor/outdoor gloss and Rust Red from Anita's All Purpose Acrylic.  You can use any colors that work for the situation, in this case a brown color would work for a more dried look or a small amount of light green or yellow would be a gross puss option.  Apply the second layer while the first layer is still wet so they can blend together.


Once you remove the template you will have a perfect outline of your image.  Be sure not to let the template move while you are painting so the layers line up.  If it is large or complicated, weights on the corners could help keep it still.  In this case, leave a little white space makes the image look good so it will be imperfect.  Be sure to dab near the edges so the image is clear.
Once you are happy with the image, mix the colors you are using a little so they are still streaked together and not completely combined and then dab large amounts of paint in several areas along the bottom of the image where you want the paint to drip.  Be sure that this is done while the paint is still wet.  Lift the shirt up and shake it a little back and forth to get the drips started.  If they are not falling the way you want to try adding a little more paint to the spot or use a small paint brush to start a small line and the drip will follow it.

After you are happy with the look of the image and the drips put the shirt back down flat to dry.  You can use the paintbrush to stipple around the drip spots on the image so the colors match.  Keep the paper in the shirt until it is completely dry.  I used acrylic paint so I can fix any spills, stains or areas that I did not like.  Once it is completely dry, you should be able to wash it without most of  the paint coming off.  I would hand wash it alone if needed.  If you want something that can definitely be washed try using fabric paint.

liz

Wednesday, October 5, 2011

Quick Fix: Blacklight Paint

We have this ghost/ghoul decoration already in our many bins of Halloween stuff so it is not a new purchase.
This is actually one of my favorite finds.  It is 14 feet long, looks really cool and was super cheap!  The head is about a foot and a half tall and it has wire arms that can be positioned that are probably about 5 feet wide.  the fabric is the long part, there is a body/train/tail that is made of black fabric with an overlay of grey mesh material that stretches to the 14 foot mark.  We got this last year at CVS for $12, look for Halloween scores everywhere.

I like the way it looks already but we usually use colored light bulbs at our parties so some of the features can be muted.  I brushed some orange and yellow black light paint over the teeth and eyes and in about 20 minutes start to finish I had an even better looking ghoul.  I found a package of black light paint at Spencer's Gifts last year that come in convenient squirt tubes so you can draw thin lines right on a project or squirt some out to paint with.

Now the eyes and teeth glow when you could barely make out the face before with the black light on it.  One of the best parts is that the face still looks the same in regular light because the black light paint is not opaque so this would still look the same if we left the lights on. 
Do whatever you can to personalize your store bought items and make them work for you!

liz

Saturday, September 3, 2011

Alter your items-dye

'Alter your items' will be a series of posts that relate to using what you have by making it into what you want it to be.  Today's is dye.  All kinds of dyes really, hair dye, fabric dye, food dye and how to make your own dyes.

Hair dye is a great way to transform your costume.  Sometimes its what makes a good costume great.  You could of course dye your hair to match your costume but I would suggest only using permanent dye when you are sure that color is something you can and want to live with for a while.  -That pink hair may seem cool until your boss sees it.  There are more temporary dyes that wash out slowly after a few weeks or months of wear.  These require less commitment but will still be around for a while after the party.  Temporary dyes that are not dyes at all but some sort of coloring that just sticks to the hair until you wash it out are great for wild looks or something you just don't want to wear every day.  These usually either come in a gel form that you comb in before you style your hair or an aerosol version that you spray on after you style it.  Either works well.  Wigs are a wonderful alternative to hair dyes but can be hard to find.  Consider picking up the right style and dying it if you cannot find the right color.  Depending on what kind of wig you have you could use either fabric dye or hair dye.  Be sure to dry it on a form so it can keep the shape.  You may even blow dry it on the form.

Food dyes are particularly great for Halloween foods.  Adding a drop of blue through my cheese dip gives it a moldy look without buying the expensive blue cheese that has the right color.  Coloring cake, cupcakes or other baked goods can turn them into almost any creepy element.  A very small amount of yellow and pink (very think red if you don't have pink) or brown (very very think black if you don't have brown) and orange will tint your lady fingers or biscuits an eerie flesh-like color to make them look like body parts.  The coolest thing I have attempted was a small amount of black food coloring added to a white cake batter to make a grey cake base for a tombstone cake. (you need more than you think you do)  It turned out pretty well.  You can tint just about anything from icing to candy to marshmallows and chocolate.  I find it is most difficult to dye chocolate and its usually easier to buy a few bags of different colored chocolate you can find at a craft store and mix them until you get the colors you want.  Melted chocolate cannot handle water so a gel or powder dye will be necessary.  Once you dye a basic icing you can create endless desserts.  Spritzing a combination of vodka and red food dye on to a pie crust or phyllo cup can give you a creepy blood splattered look, the vodka evaporates quickly so it does not dampen food like water would.  Do this before cooking or baking and most of the vodka flavor should cook off (the alcohol itself never FULLY cooks off though fyi)  When using icing or batters I prefer gel dye to liquid dye.  It does not thin out your batter or icing and has a richer color.  Betty Crocker has a great gel dye that I love to use.  Its comes in classic, dark and bright color packages.  I have occasionally found individual tubes as well.  Liquid dyes are pretty similar no matter which brand you use and I generally just pick up the store brand.  Alton Brown from Good Eats on Food Network suggests powder dyes.  I think this would be a great idea buy I have never come across these to try them.  I trust AB though.  ')  My favorite things to dye are savory items because they are less expected.  A little red dye added to a crab dip before pressing it into a brain mold makes it just the right color pink.  Spreads and dips are the easiest to dye because you just mix it in when you are stirring it.  Cheese is another one I like because you can 'paint' it on with your finger or dip it in the coloring to give the outside a fun effect.  A little dye to drinks or drink mixes is fun as well just be sure not to use enough to dye your mouth after you've had a few.  It is also difficult to get out of the carpet when someone inevitably spills.  -usually me-

Fabric dye may be the easiest way to transform something.  You an literally dye to any color you want, it just takes some practice.  Try it on an old shirt or towel to get the right technique and color.  If your costume isn't the color you wanted, try dying it.  Use fabric scraps and cheese cloth dyed with greys, blacks, greens and blues to make a spooky cloth you can cover anything with.  Fabric and paper place mats or doilies look good dyed and placed under platters or coasters.  Use eye droppers for a splattered or more intricate pattern.  The best part is that if the color does not come out right you can always just dye it again with black to cover any mistakes and black always fits in with any theme or project.  Reusing old clothes that are dyed to look different is a great way to make a spectacular costume that costs little to no money.  I would probably suggest rit dye when looking for fabric dye because I have had the most success with it.  It comes in lots of colors and is easily mixed to make more.  Their web site gives you recipes to mix 500 colors.  It always have very easy instructions; some water, salt and a little time will change anything.  Using it as paint gives you the ability to make patterns and can have a watercolor look.  I have used liquid food coloring for spots on a costume, I  have found that this washes completely out when done the next day and the garment can be used again for something else.  Ex: I dipped a night gown into green, yellow, red and brown dyes to make spots all over it when I dressed as Regen from The Exorcist and it came right out so now I wear it to bed.

Make your own when in a pinch.  Pulling the bottom off of any marker and then soaking it in water will make a thin liquid dye.  Kool Aid makes a great hair dye but it is pretty permanent and you will smell like Kool Aid for a little while.  Acrylic paint can be thinned with water and oil based paint can be thinned with vegetable oil, though the texture is a little difficult to work with.  Use your kids old water color paint sets to make weak dyes.  Dye started in nature, so experiment with that.  Grass stains can be just the right color and raspberry juice is a good blood stain substitute.
-Please be careful with natural things you are not familiar with.  You don't always know if that plant is poisonous or if you are allergic to it.

Depending on what you are using, be in a ventilated area and protect yourself and the areas around you.  Plastic table cloths and bed sheets are cheap drop cloths.  Old towels are great to soak up mistakes and rubber kitchen gloves or latex gloves keep your hands clean.

Next time things aren't quite right, try a dye and see if that helps your project.

liz