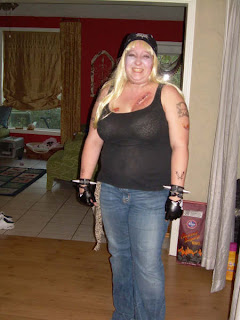
Happy Halloween everybody! I am excited for the party this weekend and to see all the pics of kids I know in their costumes. Unfortunately, we live in an apartment complex where no one trick or treats so I won't be getting any little kids at my door. I had two last year and was SOO excited that I think each one got a whole bowl of candy.
I wore a wig to work and plan on wearing one tonight. I am going to a hockey game with a friend so I'll probably dress up for that. What do you wear to work on Halloween?
Showing posts with label costumes. Show all posts
Showing posts with label costumes. Show all posts
Wednesday, October 31, 2012

Friday, October 12, 2012
Monday, October 17, 2011
Bloody Longhorn Shirt
In order to be an undead Longhorn fan, we needed the right costumes and part of that was a cool idea we came up with, a bloody longhorn. If you are unfamiliar, most Texas Longhorn shirts are white with a burnt orange longhorn symbol on the front. We decided a red, dripping longhorn would be a fun twist. You can do this with anything really. You could use a company logo or a well known image to have a little fun.

Here is how we did it.
I bought a blank white t shirt at Target to start with. Then, I traced a large longhorn from a different t shirt I already had on to a piece of paper.


 I then cut the picture out of the center.
 Put a handful of newspaper or cardboard inside the shirt to keep it flat and to be sure the image does not bleed through onto the back of the shirt. Place the template you just made over the area on the shirt where you want the image and apply the first layer of paint. A sponge works best but a brush or paper towel would work as well. Dip the sponge into the paint and then press it onto the plate or paper where you are keeping the paint so it is not overloaded. I used 2 different colors for this project, Hot Rod Red from Plaid Paints that is indoor/outdoor gloss and Rust Red from Anita's All Purpose Acrylic. You can use any colors that work for the situation, in this case a brown color would work for a more dried look or a small amount of light green or yellow would be a gross puss option. Apply the second layer while the first layer is still wet so they can blend together.


Once you remove the template you will have a perfect outline of your image. Be sure not to let the template move while you are painting so the layers line up. If it is large or complicated, weights on the corners could help keep it still. In this case, leave a little white space makes the image look good so it will be imperfect. Be sure to dab near the edges so the image is clear.
 Once you are happy with the image, mix the colors you are using a little so they are still streaked together and not completely combined and then dab large amounts of paint in several areas along the bottom of the image where you want the paint to drip. Be sure that this is done while the paint is still wet. Lift the shirt up and shake it a little back and forth to get the drips started. If they are not falling the way you want to try adding a little more paint to the spot or use a small paint brush to start a small line and the drip will follow it.

 After you are happy with the look of the image and the drips put the shirt back down flat to dry. You can use the paintbrush to stipple around the drip spots on the image so the colors match. Keep the paper in the shirt until it is completely dry. I used acrylic paint so I can fix any spills, stains or areas that I did not like. Once it is completely dry, you should be able to wash it without most of the paint coming off. I would hand wash it alone if needed. If you want something that can definitely be washed try using fabric paint.
liz


Here is how we did it.
I bought a blank white t shirt at Target to start with. Then, I traced a large longhorn from a different t shirt I already had on to a piece of paper.


liz
Saturday, September 3, 2011
Alter your items-dye
'Alter your items' will be a series of posts that relate to using what you have by making it into what you want it to be. Today's is dye. All kinds of dyes really, hair dye, fabric dye, food dye and how to make your own dyes.
Hair dye is a great way to transform your costume. Sometimes its what makes a good costume great. You could of course dye your hair to match your costume but I would suggest only using permanent dye when you are sure that color is something you can and want to live with for a while. -That pink hair may seem cool until your boss sees it. There are more temporary dyes that wash out slowly after a few weeks or months of wear. These require less commitment but will still be around for a while after the party. Temporary dyes that are not dyes at all but some sort of coloring that just sticks to the hair until you wash it out are great for wild looks or something you just don't want to wear every day. These usually either come in a gel form that you comb in before you style your hair or an aerosol version that you spray on after you style it. Either works well. Wigs are a wonderful alternative to hair dyes but can be hard to find. Consider picking up the right style and dying it if you cannot find the right color. Depending on what kind of wig you have you could use either fabric dye or hair dye. Be sure to dry it on a form so it can keep the shape. You may even blow dry it on the form.
Food dyes are particularly great for Halloween foods. Adding a drop of blue through my cheese dip gives it a moldy look without buying the expensive blue cheese that has the right color. Coloring cake, cupcakes or other baked goods can turn them into almost any creepy element. A very small amount of yellow and pink (very think red if you don't have pink) or brown (very very think black if you don't have brown) and orange will tint your lady fingers or biscuits an eerie flesh-like color to make them look like body parts. The coolest thing I have attempted was a small amount of black food coloring added to a white cake batter to make a grey cake base for a tombstone cake. (you need more than you think you do) It turned out pretty well. You can tint just about anything from icing to candy to marshmallows and chocolate. I find it is most difficult to dye chocolate and its usually easier to buy a few bags of different colored chocolate you can find at a craft store and mix them until you get the colors you want. Melted chocolate cannot handle water so a gel or powder dye will be necessary. Once you dye a basic icing you can create endless desserts. Spritzing a combination of vodka and red food dye on to a pie crust or phyllo cup can give you a creepy blood splattered look, the vodka evaporates quickly so it does not dampen food like water would. Do this before cooking or baking and most of the vodka flavor should cook off (the alcohol itself never FULLY cooks off though fyi) When using icing or batters I prefer gel dye to liquid dye. It does not thin out your batter or icing and has a richer color. Betty Crocker has a great gel dye that I love to use. Its comes in classic, dark and bright color packages. I have occasionally found individual tubes as well. Liquid dyes are pretty similar no matter which brand you use and I generally just pick up the store brand. Alton Brown from Good Eats on Food Network suggests powder dyes. I think this would be a great idea buy I have never come across these to try them. I trust AB though. ') My favorite things to dye are savory items because they are less expected. A little red dye added to a crab dip before pressing it into a brain mold makes it just the right color pink. Spreads and dips are the easiest to dye because you just mix it in when you are stirring it. Cheese is another one I like because you can 'paint' it on with your finger or dip it in the coloring to give the outside a fun effect. A little dye to drinks or drink mixes is fun as well just be sure not to use enough to dye your mouth after you've had a few. It is also difficult to get out of the carpet when someone inevitably spills. -usually me-
Fabric dye may be the easiest way to transform something. You an literally dye to any color you want, it just takes some practice. Try it on an old shirt or towel to get the right technique and color. If your costume isn't the color you wanted, try dying it. Use fabric scraps and cheese cloth dyed with greys, blacks, greens and blues to make a spooky cloth you can cover anything with. Fabric and paper place mats or doilies look good dyed and placed under platters or coasters. Use eye droppers for a splattered or more intricate pattern. The best part is that if the color does not come out right you can always just dye it again with black to cover any mistakes and black always fits in with any theme or project. Reusing old clothes that are dyed to look different is a great way to make a spectacular costume that costs little to no money. I would probably suggest rit dye when looking for fabric dye because I have had the most success with it. It comes in lots of colors and is easily mixed to make more. Their web site gives you recipes to mix 500 colors. It always have very easy instructions; some water, salt and a little time will change anything. Using it as paint gives you the ability to make patterns and can have a watercolor look. I have used liquid food coloring for spots on a costume, I have found that this washes completely out when done the next day and the garment can be used again for something else. Ex: I dipped a night gown into green, yellow, red and brown dyes to make spots all over it when I dressed as Regen from The Exorcist and it came right out so now I wear it to bed.
Make your own when in a pinch. Pulling the bottom off of any marker and then soaking it in water will make a thin liquid dye. Kool Aid makes a great hair dye but it is pretty permanent and you will smell like Kool Aid for a little while. Acrylic paint can be thinned with water and oil based paint can be thinned with vegetable oil, though the texture is a little difficult to work with. Use your kids old water color paint sets to make weak dyes. Dye started in nature, so experiment with that. Grass stains can be just the right color and raspberry juice is a good blood stain substitute.
-Please be careful with natural things you are not familiar with. You don't always know if that plant is poisonous or if you are allergic to it.
Depending on what you are using, be in a ventilated area and protect yourself and the areas around you. Plastic table cloths and bed sheets are cheap drop cloths. Old towels are great to soak up mistakes and rubber kitchen gloves or latex gloves keep your hands clean.
Next time things aren't quite right, try a dye and see if that helps your project.
liz
Hair dye is a great way to transform your costume. Sometimes its what makes a good costume great. You could of course dye your hair to match your costume but I would suggest only using permanent dye when you are sure that color is something you can and want to live with for a while. -That pink hair may seem cool until your boss sees it. There are more temporary dyes that wash out slowly after a few weeks or months of wear. These require less commitment but will still be around for a while after the party. Temporary dyes that are not dyes at all but some sort of coloring that just sticks to the hair until you wash it out are great for wild looks or something you just don't want to wear every day. These usually either come in a gel form that you comb in before you style your hair or an aerosol version that you spray on after you style it. Either works well. Wigs are a wonderful alternative to hair dyes but can be hard to find. Consider picking up the right style and dying it if you cannot find the right color. Depending on what kind of wig you have you could use either fabric dye or hair dye. Be sure to dry it on a form so it can keep the shape. You may even blow dry it on the form.
Food dyes are particularly great for Halloween foods. Adding a drop of blue through my cheese dip gives it a moldy look without buying the expensive blue cheese that has the right color. Coloring cake, cupcakes or other baked goods can turn them into almost any creepy element. A very small amount of yellow and pink (very think red if you don't have pink) or brown (very very think black if you don't have brown) and orange will tint your lady fingers or biscuits an eerie flesh-like color to make them look like body parts. The coolest thing I have attempted was a small amount of black food coloring added to a white cake batter to make a grey cake base for a tombstone cake. (you need more than you think you do) It turned out pretty well. You can tint just about anything from icing to candy to marshmallows and chocolate. I find it is most difficult to dye chocolate and its usually easier to buy a few bags of different colored chocolate you can find at a craft store and mix them until you get the colors you want. Melted chocolate cannot handle water so a gel or powder dye will be necessary. Once you dye a basic icing you can create endless desserts. Spritzing a combination of vodka and red food dye on to a pie crust or phyllo cup can give you a creepy blood splattered look, the vodka evaporates quickly so it does not dampen food like water would. Do this before cooking or baking and most of the vodka flavor should cook off (the alcohol itself never FULLY cooks off though fyi) When using icing or batters I prefer gel dye to liquid dye. It does not thin out your batter or icing and has a richer color. Betty Crocker has a great gel dye that I love to use. Its comes in classic, dark and bright color packages. I have occasionally found individual tubes as well. Liquid dyes are pretty similar no matter which brand you use and I generally just pick up the store brand. Alton Brown from Good Eats on Food Network suggests powder dyes. I think this would be a great idea buy I have never come across these to try them. I trust AB though. ') My favorite things to dye are savory items because they are less expected. A little red dye added to a crab dip before pressing it into a brain mold makes it just the right color pink. Spreads and dips are the easiest to dye because you just mix it in when you are stirring it. Cheese is another one I like because you can 'paint' it on with your finger or dip it in the coloring to give the outside a fun effect. A little dye to drinks or drink mixes is fun as well just be sure not to use enough to dye your mouth after you've had a few. It is also difficult to get out of the carpet when someone inevitably spills. -usually me-
Fabric dye may be the easiest way to transform something. You an literally dye to any color you want, it just takes some practice. Try it on an old shirt or towel to get the right technique and color. If your costume isn't the color you wanted, try dying it. Use fabric scraps and cheese cloth dyed with greys, blacks, greens and blues to make a spooky cloth you can cover anything with. Fabric and paper place mats or doilies look good dyed and placed under platters or coasters. Use eye droppers for a splattered or more intricate pattern. The best part is that if the color does not come out right you can always just dye it again with black to cover any mistakes and black always fits in with any theme or project. Reusing old clothes that are dyed to look different is a great way to make a spectacular costume that costs little to no money. I would probably suggest rit dye when looking for fabric dye because I have had the most success with it. It comes in lots of colors and is easily mixed to make more. Their web site gives you recipes to mix 500 colors. It always have very easy instructions; some water, salt and a little time will change anything. Using it as paint gives you the ability to make patterns and can have a watercolor look. I have used liquid food coloring for spots on a costume, I have found that this washes completely out when done the next day and the garment can be used again for something else. Ex: I dipped a night gown into green, yellow, red and brown dyes to make spots all over it when I dressed as Regen from The Exorcist and it came right out so now I wear it to bed.
Make your own when in a pinch. Pulling the bottom off of any marker and then soaking it in water will make a thin liquid dye. Kool Aid makes a great hair dye but it is pretty permanent and you will smell like Kool Aid for a little while. Acrylic paint can be thinned with water and oil based paint can be thinned with vegetable oil, though the texture is a little difficult to work with. Use your kids old water color paint sets to make weak dyes. Dye started in nature, so experiment with that. Grass stains can be just the right color and raspberry juice is a good blood stain substitute.
-Please be careful with natural things you are not familiar with. You don't always know if that plant is poisonous or if you are allergic to it.
Depending on what you are using, be in a ventilated area and protect yourself and the areas around you. Plastic table cloths and bed sheets are cheap drop cloths. Old towels are great to soak up mistakes and rubber kitchen gloves or latex gloves keep your hands clean.
Next time things aren't quite right, try a dye and see if that helps your project.
liz
Tuesday, August 30, 2011
Meet the Authors
This Halloween will mark our 6th Annual Halloween Party together. Until you can get to know us through this blog, here are few photos of our costumes over the years together.




Subscribe to:
Posts (Atom)